Author Archives: Millie Padmanabhan

About Millie Padmanabhan

I am a 3d art and animation student in Sydney at Enmore Design Centre. I have a passion for art and love classic animation right from scratch. Sharing some of my opinions about my favourite films!

Dynamics inspiration

Standard

Inspiration and development of Dynamic effect


VFX has a broad variety of simulations and effects that create a montage and style for films. They encompass and bring films to life adding depth, excitement and entertainment. Technology and software have reached new heights where reality can be mimicked to heighten and engage viewers to a new level. Ndynamics has contributed to visual feasts and breakthroughs in the last few years, as many unachievable effects are now in our fingertips.

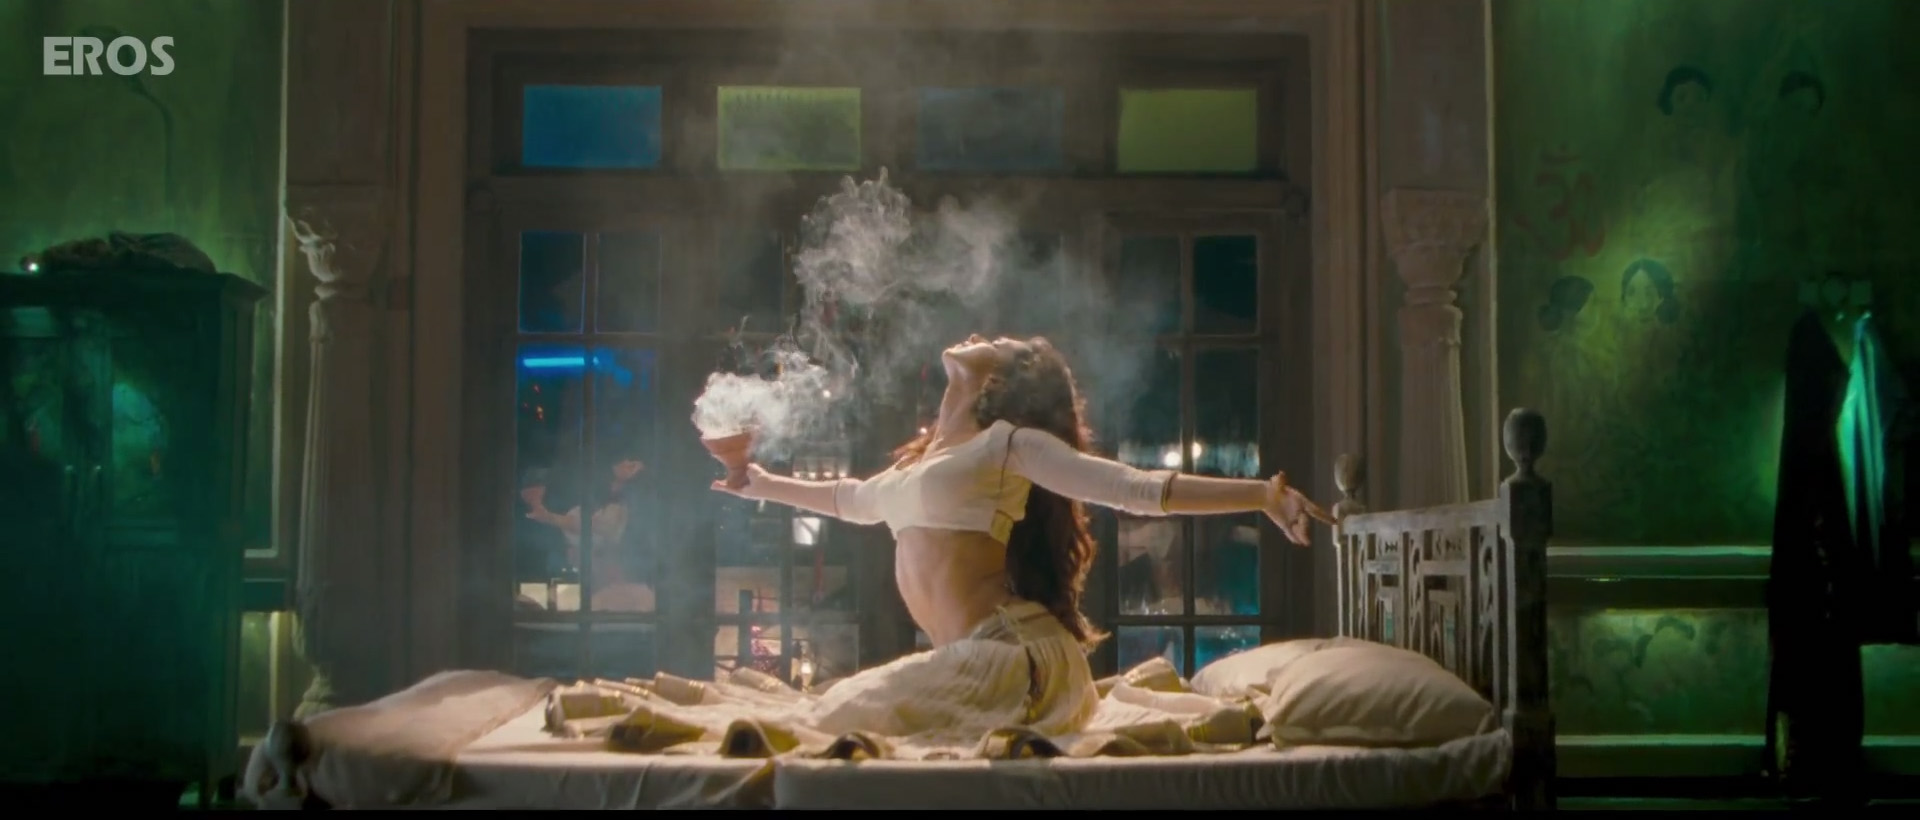
Smoke effects have intrigued and increased curiosity for many artists and this report will explore an inspiration and goal for a smoke particle effect. By nature smoke is subtle and a very interesting effect to generate. The main inspiration is a hookah bong which is the centre-piece of a personal project.

Scientific qualities if smoke describe it as “ a collection of tiny solid, liquid and gas particles. Although smoke can contain hundreds of different chemicals and fumes, visible smoke is mostly carbon (soot), tar, oils and ash.” Smoke occurs when there is incomplete combustion (not enough oxygen to burn the fuel completely). When creating smoke as an effect, it is important to keep such facts in mind as it can mould one’s understanding of the phenomena. (Govt, 2009)

Smoke has specific characteristic such as a vapor like quality. It is also hazy and misty in nature. The gaseous trait of smoke is something to pay attention to as this is what will create majority of the simulation. There are varieties in smoke such as; combustion smoke, cigarette smoke, magic smoke, explosion aftermath smoke and fog to an extent. In essence the aim would be to create a “smoke bomb effect”.

These were some inspirations and ideas that could assist in brining this simulation to life! This bollywood film had some great examples of realistic smoke and how effective it is in films. The idea would be to replicate this effect. 

smoke_01 smoke_02 smoke_03 smoke_05 smoke_06 smoke_bomb 


The smoke bomb videos are also a great source of inspiration, especially the colours that arise from them. The pressure is something to pay attention to with the smoke bombs. 


Lighting scenario

Standard

For this lighting assessment, I wanted to create something that would suit the mood and atmosphere I was trying to emulate in the room. I wanted a dusty and “used” look to the whole render. I decided to do an evening scene, to show off the lighting and all the aspects of the room such as the glass bottles,the stairs and the windows. I wanted volume scattering to create a certain amount of mood in the room. The scattering also acted like god rays, bringing the room to life.
I had two main lights in the room. One acted as a main source flooding through the rounded window and the other was light streaming in from the larger french window. The main light source was the centre piece of the room and gave it character. The secondary light source gave it another dynamic and realistically there would be some amount of light coming in through any window. I also added a physical sun and sky. The two lights used were area lights.
I felt the shadows worked quite well and there was a good balance between light and darkness in the room. I did want to create mystery and intrigue in the room which was possible due to the feature light from the round window. I also used the kelvin temperature in the Arnold section to get a realistic and accurate result in the lighting. This gave a clear idea of the final look I wanted to achieve.
These were some of the references I used to guide me through the exercise.

golden_hour_01 golden_hour_02


legend of korraThe last image really spoke to me and related to my style of lighting thoroughly. I wanted to achieve this look. These were the two lighting scenes, I produced.

dof_render_01 dof_render_04


Dynamics progress and overview week 15

Standard

Progress and inspiration: After the progress review in week 9, I decided to take a completely different direction with my UFO project; the style, look and feel and overall ambience. I wanted a rave light effect with beams of light scattered around the UFO. I agree with the first review where the swarming particles around the UFO didn’t quite work as it mainly distracted the viewer’s attention and diverted it from the main focus, which was the UFO.

blue_rave_light rays_01This example was quite useful for me and relevant to my idea–>

http://www.youtube.com/watch?v=drqEEMCw6es

http://www.youtube.com/watch?v=X4M9sSoBUpU

I was really looking for the thin strand effect achieved with rave lighting. I thought this would be a great effect to achieve and showcase. I wanted to make use of the expressions that we learnt in class to achieve these results.

Progress and development: My first few attempts were not very successful as I wasn’t getting the exact effect I wanted to achieve. The light beam effect wasn’t quite working as well as I thought it would. Nevertheless, I decided to explore a little bit more with attributes such as the radius PP and Opacity PP to achieve my effect. I also changed the streak size and tail attributes of the type of particles I was using.

Image converted using ifftoany Image converted using ifftoany

I wanted to use the goal particles technique we studied in class and apply it to this instance. I thought of using two sets of particles, one would be the actual beam/beams of light and the other a swarming effect of particles. I wanted to grab all the information that we used in class and apply it to the project. These were some of my results with the beam of light and I thought it worked quite well in terms of my reference, as it embodied similar characteristics in terms of style and atmosphere.

Image converted using ifftoany Image converted using ifftoanyImage converted using ifftoany


MEL Scripting

Standard

script_005

  • Description and purpose: My script is basically a window that creates a shader library of five stone textures. This script was just a trial to build my foundations for next year and have an efficient way of texturing objects for models of temples, environments e.t.c. for the reel. The purpose of my MEL script was basically to have access to a set number of shaders and textures that are relevant to my show reel next year. I wanted to create something really simple and accessible.

Inspiration: My main motivation and inspiration was to create something that allowed me to understand scripting better and create something that would not only be useful but valuable for my ordeals next year.

Top- down development: Before I started my script I did quite a bit of research as to what type of script I wanted and how complex it would be. I knew that I couldn’t create something too complex due to time and insufficient knowledge constraints. I gathered quite a bit of information and found some useful sources that could help my script development. I decided to go through with something simple, efficient and usable!

I first started off with creating and defining my window. I used the proc window examples we did in class as reference and the method I used to carry out the script. The renaming and selecting objects command that we learnt in class was quite helpful for me.

proc_example

  • In my first instance, I defined my window and the UI for example the name of the window and the dimensions. I also defined and created my buttons for the window that would connect to my procs further in the script. The command flag connects the procs to the buttons in the window. mil_script_001
  •  This next part, basically calls for a polysphere to be created when the button is activated. The proc creates 5 total spheres. It also defines the position of each sphere. mil_script_002
  • This proc is basically activating the creation of a phong shader and sets certain attributes such as transparency, the color of the shader and the assigning of a Brownian texture to the surface. It uses the set attribute command to activate the changes to the surface shader. The first line basically asks maya to list all the attributes of the selection. The next one asks maya to assign a specific shader to the selection. Then the script connects the shader’s color attribute to the surface shader group. The next part of the script asks Maya to connect a texture to the shader that was assigned and connects the color attribute of the shader to the color attribute of the texture. mil_script_002
  • The next few procs basically follow the same pattern as assigning different types of shaders and having custom attributes such as 3d textures and various color values. I found the set attribute command quite useful and relevant. script_004
  • I added a shatter proc to give the effect of broken rock to give it more of a realistic effect. This script was quite easy as it basically asked Maya to select the object and delete its history. After that it created a replica of the object with the specified shatter values.

shatter_001

Reflection: In hindsight, I thought there were several things that I would have improved and several skills that I learnt through the way! I would have liked to have a more complex library of shaders and improve on the textures themselves. I would have also liked to have a better window layout with more customisation. There are still vast improvements that I would have liked to implement in my script in terms of efficiency and execution. That being said, the script was simple, useful and could be seen as a small scale version of something that could be developed further next year!

“Not every MEL statement is a MEL command. MEL commands are operations that manipulate your Maya scene that are either built in to Maya or provided by plug-ins. Like functions (both built-in functions and those that are implemented in MEL), MEL commands can return data values to your script. Like procedures written in MEL, MEL commands can alter your scene in useful ways.” I found this quote by Mark R Wilkins and Chris kazmier from the book MEL Scripting for animators quite helpful as it shorty summarised the whole point of creating a MEL script! This affected my final result quite a bit as I was thinking about the functionality and usage more than anything else. ” The top-down approach requires that you first work out a statement of what problem you’re trying to solve with your program, then a statement of the basic steps that your program has to take to yield a solution. Once you have started with a “top level” statement of the problem you’re trying to solve, you move one step into sorting out the detail of solving it by breaking it up into component steps. Then, repeatedly break each step that you have identified into smaller steps.” This line was also from the book MEL scripting for animators and it really put into perspective how to approach the subject as a whole and writing a fundamental script.

“Once you define a global procedure, you can call it anywhere: from any script file, within any function, or from the command line.

  • the global keyword makes the new procedure available everywhere.
  • The proc keyword indicates you are defining a procedure.

Variables that are local to a procedure are separate from global variables and separate from variables in other procedures. A local variable will override a global variable with the same name within the procedure. All this allows you to write procedures without worrying whether the variable names you choose will conflict with Maya or other procedures.” This is from the autodesk Maya user guide 2012 and helped me understand procs a bit more before I used them in my script. It suggests the advantages of using procs and helps you get a more in depth understanding of different approaches of MEL scripting and layouts.

UFO project and process

Standard

After I had my research and concepts down, I brainstormed what sort of path I wanted to take to achieve my particle effects and systems. I wanted big bright beams of light and something that resembled a “force field” of particles whizzing around the scene. With the actual tractor beam of light, I wanted a swarmy effect of particles coming down and abducting the wooden man.

I used this as a close reference for me and the German movie trailer of the swarmy particle effect.

For the force field I wanted to achieve I had goaled particles to each other similar to what we had done in class. I created a leader emitter, a goal emitter and a trail emitter! I used a turbulence field for the leader and goal emitter, which made the movements violent and random of the force field effect.

outliner

Northern-lights-1I thought this was quite useful and helpful for the UFO effect. I used the spheres in the scene that come down and abduct the man as a “trail” or “track” for my other set of particles that act as a swarmy beam! swarmyI used an air field and newton field for the swarmy effect that follows the spiral.

image_03

UFO dynamics research

Standard

With this assessment I felt I had to do a lot of research and brainstorming before putting anything into practice! I found the resource footage that we were given in class quite helpful and concise. Our teacher made it quite clear the brief and what he expected as the  “client”. This was great as I knew approximately what I needed to work to and achieve by the end of the exercise.

This is some of what I used as reference and research–>

tractor beamNorthern-lights-1x63_aurora_borealis_by_halonacc

This video had some great particle effects that I though would be useful for me in this project! The colors used were also similar to what we needed to do in the brief! I also thought movies such as prometheus would be great reference for particle systems and how they integrate these with animation and live action

This video wasnt as relevant to the project but I thought I could use some of concepts such as the swarmy nature of the particle forming into a shape/person! Thought it was a great idea!

Week 5 waterfall simulation

Standard

For this week we were given the exercise to create  a waterfall particle simulation with everything we had learnt about goal instancing and applying it to a scene where geometry is uneven and you have cars or objects passing through them.

For this I dint use an instancer replacement. I wanted to use the particles themselves to make it look more like water. I first selected my geometry and then went to emit from object. Then I selected my particle one and then my geometry and went to goal. This action made sure that the particles would follow the geometry and not in a flat line.

As in class the particles were following this pattern when you played through the simulation. I wanted a random effect so that it looked like the particles were flowing. I added some extra attributes that we added in class, goalU, goalV, parentU, parentV, randSpeed and randTurn. These would define the parameters of the particle simulation. These were the settings I used–>

set_2

I realised that the particles were only covering a small area through the simulation, but when I started tweaking the settings I realised that it had something tp do with my randTurn attribute and how long it’s meant to last. I changed the time to 0.05 which made a huge difference in the speed and the amount that the particles fell at.

set_4

I used a gravity field to make the simulation look realistic and natural. I had the set the magnitude upto 200 which seemed to work pretty well. I also used a turbulence field to add randomness and sporadic movements through the simulation. I had the magnitude set upto 300 which had tamed the amount of randomness through the simulation. I also used a turbulence field to make the simulation look random and naturalistic.

I also had to change the lifespan of the particles to lifespanPP in order to see whether the expression worked properly.  Here’s the video–> https://www.youtube.com/watch?v=AddNctNKv8Q&feature=youtu.be

some research material->

water_falll


water_fall_2

Week 3- Biplane particle simulations

Standard

For this week, we had to create a squadron of exactly 72 planes, which were meant to look random and travelling in their own paths over 100 frames.

I decided to follow the examples we were shown in class with the snapshot groups. This was more tricky as there was animation on the propeller and the plane was divided into a group of 2. I selected the planes and propellers individually and created the snapshot. These were the setting I used–> I also changed the max count to 72, to make sure there were only 72 particles coming out of the simulation.

To make the simulation random I wanted to create a turbulence field which reflected the squadron effect of the planes flying past. I also used a drag field, to test the limitations and what I can achieve with that.

These were some the settings I used–>

set_1

snap_shot

This is the final video–> http://www.youtube.com/watch?v=3QvLbh_2ht0

I did have some trouble with jumpiness and disturbances through the simulation and couldn’t identify the problem.

Week 2- Creating rain particles

Standard

For the exercise this week, we had to replicate the rain particles that we created in class and compare scale issues/sizes. We had to replicate the rain rig to be 1/10th of the size we used in class.

To start with I decided to calculate the scale of my planes to 80, as the initial scale was 800. This would have a big impact on the area that the rain would cover. This is an example of the settings.

settings_001

I had basically just followed the steps that we did in class to set-up the rain, but when it came to attributes such as the rate of the emitter I changed it to 2000 instead of 20,000 after the calculations.

I also paid close attention to the magnitude attributes for my turbulence and gravity fields. The magnitude controls the strength of the field which inturn affects how much rain falls in a particular region according to it’s scale. I changed the magnitude values of gravity to 98 from 980 and the turbulence field from 250 to 25.

These were my turbulence field settings: Some of the tweaks made a huge difference after I calculated 1/10th of the size. chair_003Here’s the link to the video–> https://www.youtube.com/watch?v=SpPJdJcMY4I&feature=youtu.be

  • The advantages of creating a rain scene with such a scale would be that it is easy to control and monitor. You could easily tweak something, without having to wait while the frames render.
  • It conserves energy and time, so I guess more practical.
  • If you had other particle simulations, it would make more sense to use something of this scale as you could achieve faster results, but maybe not higher quality.

Advantages of using the scale used in class would be that:

  • It is more accurate and mimics reality if that is the effect you wanted to achieve.
  • The fields would apply more and work better as they are designed to work for realistic simulations
  • You could enhance and detail the simulation by using real-life references and scales.

ld use both the sales depending oI woun what I am trying to achieve and how much detail I want in the rain simulation, realistic or stylistic.


Week 1- chair particle animation

Standard

The aim for this exercise in class was to create a particle effect that would make the chair disintegrate into particles. I thought about how I could achieve this effect and decided to convert the actual chair into a collection of particles.

The first thing I did was create a particle emitter from the chair, so by selecting the chair I went into particles–> emit from object. These are the setting I used–> I didn’t have any speed as I wanted the particles to build up into a thick mesh.

chair_002The next thing I did was when I was happy with the density of the particles say at frame 200. I selected the particles, went into solvers–> initial state and selected the option set for selected. This meant that whatever was on frame 200 would copy across to frame one.

After this I deleted the actual chair mesh, so only the geometry was left. After this I created a turbulence field. You could have any settings you wish on these, mine were these–>

chair_003

When you play the animation, the chair should disintegrate. You can also texture your particles, I mapped the texture maps in the

chair particles Here’s the link to the video.